Showing posts with label Season: Fall. Show all posts
Monday, November 4, 2013
Math Monday Blog Hop: Thanksgiving Math
Welcome to Math Monday Blog Hop!!!! In this hop all links will relate to the theme: Thanksgiving Math.
My greatest math/Thanksgiving lesson ever was the one in which we combined handprint turkeys with our math calendar for the month:
How do you bring math into your seasonal celebrations? Post your ideas in the blog hop below!
**************************************************************************************************************
If you want to share this collection on your blog, just grab this link:
get the InLinkz code
Labels:
Math Monday Blog Hop,
Season: Fall
Friday, November 18, 2011
Leaf Placemats, Collages, Thanksgiving Decor!
Around here, we still have a LOT of leaves falling. This project would make a great Thanksgiving decoration...
While studying "L is for Leaf," we read Read Leaf, Yellow Leaf. For each student I anchored a sheet of contact paper, sticky side up, to the table with a tiny piece of tape in each corner. Students then covered the contact paper with leaves. I used dried leaves although I think fresh fallen leaves would work as long as they weren't wet. Because we were studying "L is for Leaf," each student then put a cut "L" on top of their leaves. You could substitute a Thanksgiving sticker or picture if you were making Thanksgiving placemats. I then put a top layer of contact paper on the collage and trimmed the edges. We hung our projects, so I hole-punched the top and made a loop with yarn.
We also read two more books that explore how you can make pictures out of leaves, Look What I Did with a Leaf! and Leaf Man. Collages like this could also be used on contact paper for decorations or placemats.
Linking up to stART.
Disclaimer: If you order from Amazon, all commissions go toward foster care through Grace and Hope at no additional cost to you. THANK YOU!
While studying "L is for Leaf," we read Read Leaf, Yellow Leaf. For each student I anchored a sheet of contact paper, sticky side up, to the table with a tiny piece of tape in each corner. Students then covered the contact paper with leaves. I used dried leaves although I think fresh fallen leaves would work as long as they weren't wet. Because we were studying "L is for Leaf," each student then put a cut "L" on top of their leaves. You could substitute a Thanksgiving sticker or picture if you were making Thanksgiving placemats. I then put a top layer of contact paper on the collage and trimmed the edges. We hung our projects, so I hole-punched the top and made a loop with yarn.
We also read two more books that explore how you can make pictures out of leaves, Look What I Did with a Leaf! and Leaf Man. Collages like this could also be used on contact paper for decorations or placemats.
Linking up to stART.
Disclaimer: If you order from Amazon, all commissions go toward foster care through Grace and Hope at no additional cost to you. THANK YOU!
Labels:
Children's Books-Other,
Season: Fall
Thursday, November 17, 2011
Turkey Calendar
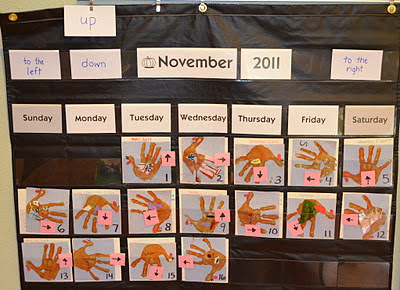
When I saw the calendar pattern that Little Miss Kindergarten did with turkeys, I just had to try it! And then when I saw the Fancy Nancy handprint turkeys at Almost Unschoolers, I wanted to include that idea. (Both of these bloggers are brilliant!) With their great ideas and a free online lesson from The Math Learning Center, you can do this, too! Before Thanksgiving!
Here's the plan:
1. Read Fancy Nancy Our Thanksgiving Banquet. You'll be inspired to create fancy handprint turkeys.
2. Read Setting the Turkeys Free(link below). In this adorable book, "A young boy uses his hands, paint, sequins, and everything imaginable to make beautiful turkeys in his picture. Soon his imagination takes over, and the turkeys take on a life of their own."
3. Have kids make a set of 30 fancy handprint turkeys on squares that will fit into a calendar pocket chart. (I use the large one.) If you want to have multiple access points to your pattern, use two background colors like Little Miss Kindergarten did. I used only one background color.
4. Print this free lesson plan from The Math Learning Center for a butterfly calendar: C3 Flying Butterflies. (You'll find it under "geometry.") The lesson calls for you to print butterflies calendar grid cards (also free) and have the kids explore the pattern as the butterflies point in four directions: up, to the right, down, to the left. Follow the lesson, using turkey cards instead of butterflies. To do this, you'll want to arrange the pattern for yourself first, then add dates to the cards so that the date is always in the correct location, even when the turkeys turn.
5. Do the lesson with your classroom or homeschool child. You can do it with one card at a time (if you start on Nov. 1st) or do a week or more of cards at a time if you start later in the month. We've been doing about a week at a time.
Reflections:
In doing this with a 5.75yo, I found it helpful to add some additional support, both to recognize the pattern and to understand direction. I tried a lot of things:
*I had the child point each direction as we reviewed each card. As we reviewed each card, we also chanted the direction aloud: "up, to the right, down, to the left...up, to the right, down, to the left."
*When the pointing seemed a little weak, I added whole body movement. We stretched to the ceiling, moved to touch a chair to the right, touched the floor, and moved to touch a chair to the left.
*When the directions/pattern still seemed a little weak, we made a pointer with our Purplinker and pointed in each direction as we chanted through the pattern.
*I made a bunch of arrow cards (see pink in photo) and had the student put the cards in each pocket to show (again!) which direction the turkey feathers were pointing.
The student started to be able to predict the pattern with some consistency around day 15. So he didn't find this pattern easy. But it's so worthwhile! Anybody else know teenagers...perhaps adults...who still don't know right from their left? ;)
Note: Behind each of our turkeys you can see the white cards peeking out which contain our daily journal entries. It works great to put the calendar pattern in front of each entry.
Thank you!: This lesson is thanks to The Math Learning Center, Little Miss Kindergarten, and Almost Unschoolers. Linking up to stART and TGIF Linky Party.
Disclaimer: If you order from Amazon, all commissions go toward foster care through Grace and Hope at no additional cost to you. THANK YOU!
Here's the plan:
1. Read Fancy Nancy Our Thanksgiving Banquet. You'll be inspired to create fancy handprint turkeys.
2. Read Setting the Turkeys Free(link below). In this adorable book, "A young boy uses his hands, paint, sequins, and everything imaginable to make beautiful turkeys in his picture. Soon his imagination takes over, and the turkeys take on a life of their own."
3. Have kids make a set of 30 fancy handprint turkeys on squares that will fit into a calendar pocket chart. (I use the large one.) If you want to have multiple access points to your pattern, use two background colors like Little Miss Kindergarten did. I used only one background color.
4. Print this free lesson plan from The Math Learning Center for a butterfly calendar: C3 Flying Butterflies. (You'll find it under "geometry.") The lesson calls for you to print butterflies calendar grid cards (also free) and have the kids explore the pattern as the butterflies point in four directions: up, to the right, down, to the left. Follow the lesson, using turkey cards instead of butterflies. To do this, you'll want to arrange the pattern for yourself first, then add dates to the cards so that the date is always in the correct location, even when the turkeys turn.
5. Do the lesson with your classroom or homeschool child. You can do it with one card at a time (if you start on Nov. 1st) or do a week or more of cards at a time if you start later in the month. We've been doing about a week at a time.
Reflections:
In doing this with a 5.75yo, I found it helpful to add some additional support, both to recognize the pattern and to understand direction. I tried a lot of things:
*I had the child point each direction as we reviewed each card. As we reviewed each card, we also chanted the direction aloud: "up, to the right, down, to the left...up, to the right, down, to the left."
*When the pointing seemed a little weak, I added whole body movement. We stretched to the ceiling, moved to touch a chair to the right, touched the floor, and moved to touch a chair to the left.
*When the directions/pattern still seemed a little weak, we made a pointer with our Purplinker and pointed in each direction as we chanted through the pattern.
*I made a bunch of arrow cards (see pink in photo) and had the student put the cards in each pocket to show (again!) which direction the turkey feathers were pointing.
The student started to be able to predict the pattern with some consistency around day 15. So he didn't find this pattern easy. But it's so worthwhile! Anybody else know teenagers...perhaps adults...who still don't know right from their left? ;)
Note: Behind each of our turkeys you can see the white cards peeking out which contain our daily journal entries. It works great to put the calendar pattern in front of each entry.
Thank you!: This lesson is thanks to The Math Learning Center, Little Miss Kindergarten, and Almost Unschoolers. Linking up to stART and TGIF Linky Party.
Disclaimer: If you order from Amazon, all commissions go toward foster care through Grace and Hope at no additional cost to you. THANK YOU!
Labels:
Calendar,
Geometry,
Kindergarten,
Season: Fall
Subscribe to:
Posts (Atom)
